SIDigital Animation


RESEARCH
A weekly collection of research I have done for my FMP into
scripting, UnReal Engine, Maya FX, and 3D performance animation.
Scripting Research
For this project I began with a script. I know how to write scripts, but the way I plan to utilise the FMP required quick cuts which I didn't know how to portray so I found this article from StudioBinder with additional formatting properties. I cross-referenced the film scripts for DNEG's Nimona (2023) and Pixar's Elemental (2023) from Deadline as an example of industry standard scripts.
Reference Footage Test
Let me say that I don't have a cat, or know any cat owners. To give a visual reference to my idea, I complied a variety of cat videos from TikTok and videos I took of myself. The video on the right is some of the better footage I managed to find. I was not happy with the overall footage and intended to revise it immediately, but it did communicate the general idea of the story I was trying to communicate.
Exploring Character Rigs

For this project, I found various rigs I wanted to use and was in the process of narrowing down the story. For my first draft, I imagined David (the main character) being more reptilian and using certain appendages to interact with Berry (the cat), like a tail to pet Berry's head. However upon testing the rig, I realised there were a lot of aspects of the rig I wasn't liking: specifically the scales on Reptilian's head down through to its tail. It's style didn't fit the simplistic look I particularly wanted to incorporate. The other rigs I was interested in were Alpha, Mr. Buttons and Little Kitty. Alpha and Little Kitty. I started leaning more towards Alpha since the spots and design make for more interesting complexities.


Re-Exploring Rigs
After the review with my tutor, I researched additional rigs. Little Kitty rig was approved for the project due to its appeal. I settled on the "Superhero" rig from Agora Community, as the character is colourful and visually loud in comparison to the dark kitty. I plan on testing the rig properly after approval.


Story Workshop
The first workshop I participated in was a Story Workshop around narrative storytelling. A lot of these concepts I was familiar with because of my research and development into screenwriting, but it was really interesting revising these storytelling aspects in the perspective of script to screen for my own story.
Three Act Structure
The Three Act structure focuses on three parts of a story's progression: Set Up (Act One), Confrontation (Act Two), and Resolution (Act Three).
-
Act One focuses on introducing the status quo and the inciting incident and how our charater(s) react to this.
-
Act Two focuses on ascending the narrative by introducing more and more obstacles along the way; developing a mid-point (a big twist) and building up to a disaster and crisis in the end of Act Two.
-
Act Three is the resolution of a story. This is where the story reaches its conclusion after the grand events of the story's climax to wrap up and end the narrative
A three act structure is very typical of a contemporary narrative. However, it can be used and subverted. Hayao Miyazaki's Spirited Away has an atypical story climax which is quite and mundane, which greatly contrasts with the bustling action of the film's narrative events.
Controlling Idea
We explored simplifying our ideas into a very short phrase. I was more familiar with this as "Loglines" where you summarise a film with one line, which you often see on film pamphlets or on film streaming descriptors. The difference between Controlling Ideas and Loglines is that the Controlling Idea is for the creators developing the story, whereas a Logline is for the audience to intruige them to experience the finished story. The story has to be intruiging enough for the audience to be intruiged, while being honest about the story. If the story couldn't fit in that one phrase, it was a good indication the story planned may be too complex.
Examples from the Workshop
-
'A lonely boy is befriended by an alien'. (E.T.)
-
'A small town is terrorised by a shark.' (Jaws)
-
'A small boy sees dead people.' (The Sixth Sense)
So my controlling idea for my FMP would be 'A human protects his cat.'
Story Elements
For this, we discussed the main elements of a story. To give a clear explaination, I will use Into the Spider-Verse (2018) as examples for each on how the story develops.
Exposition -> Inciting Incident -> Progressive Complications -> Crisis / Climax -> Resolution
-
Exposition: The way to reveal the key elements of the story to the audience, like characters and the status quo, established early in Act One. (e.g. Into the Spider-Verse introduction to Peter Parker and Miles Morales)
-
Inciting Incident (known in the Hero's Journey as 'The Call to Action'): This is the event which motivates the character towards new aspects of the stories and shakes up their status quo. (e.g. Peter realising Miles is a Spider-Man and dying soon after to the Prowler and King Pin)
-
Progressive Complications / Rising Action: Utilising the exposition and the motivation created by the Inciting Incident, the characters encounter a number of problems along the way which they have to face. (e.g. the collapse of the multiverse, Doc Ock, Miles being rejected by the other Spider-People, his uncle is the Prowler, etc.)
-
Crisis / Climax: This is when the story hits its narrative high point and several of the complications converge. (e.g. the fight in the basement of the hotel)
-
Resolution: This is the falling action and gives the audience a moment to breathe asthe story resolves itself. (Miles is officially a Spider-Man, King Pin is locked up, etc.)
Buster Keaton - The Art of the Gag
Buster Keaton is a silent comedian who is well known for his physical comedy and storytelling. He was introduced to us to explore humour and relying on action rather than dialogue, since animation is a very visually-dependent medium and is able to explore exaggeration much more efficiently than live action. Also how to use the camera to tell this gag, since the angle and framing is very important.
Reversal Beats
Reversal Beats focus on developing humour from a character using complicated methods to achieve their goal, and subverting it against audience expectations. We (in a group) did a story about a man demanding strawberries, not getting strawberries, then when he finally does get the strawberries, he ends up in an ambulance since he has allergies. The feedback we recieved was that the ambulance was too 'out of nowhere' and didn't make sense that the person insists for strawberries if he knew he was allergic. So we, in our group, didn't do a good enough job with exposition in our story and that was a good way to experiment with it.
UnReal Engine Workshop (Part 1)
One of the first workshops I took part in was on UnReal Engine: introduction to the software and experimenting with lighting. The work done here was through following certain tutorials in the workshop to understand the rendering capabilities of UnReal Engine 5 for film and television.
Sky Dome (Heliodome) Setup
-
Setting up UnReal Projects and general overview on lighting in UnReal using Lumen Methods
-
Learned that UnReal autoloads certain Items (such as Player Start) and what to delete and what to keep
-
Setting lighting scence with Directional Light, Sky Atmosphere (with Real Time Capture to have proper light reflections on objects), Exponential Height Fog, Post Process Volume (with 'Infinite Extent (Unbound)'), and Volumetric Cloud
-
-
Applying materials to objects in UnReal by dragging and dropping for auto application
-
Altering textures properites (like roughness and metalness) by using the materials panel
-
Testing Camera with CineCamera Actor, matching the settings to the Post Process Volume, developing a level sequence and keyframing camera movements
-
Setting Render settings with .png sequence and Anti Aliasing Sample counts
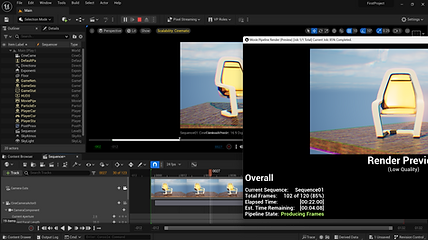
Lumen - Exterior HDR Lights
-
Using HDR backdrop of an exterior and using lighting to match assets to HDR lighting
-
Using Projection Center > Use Camera Projection to turn the HDR dome into a more realistic application

Lumen - HDR Lights & Interior Lighting
-
Using HDR backdrop of an interior and using lighting to match assets to HDR lighting
-
Using knowledge from the last two exercises and applying it here.
Animation Style Inspiration
I began to explore what I imagined the visual style of the story would be. As an animator who is more interested in stylised and cartoony animation, I wanted to explore with both styles of animation for my FMP. After speaking to my tutor, we talked about using the animation style to the advantage of the story. As an example, if a character was interested in Spider-Verse, then switching between a typical render and a rendering animation similar to the style of Spider-Verse films with superhero-based actions.
Kizazi Moto: Generation Fire "Enkai" (Triggerfish Animation / BlinkInk)
"Enkai" has a stepped stylistic animation for character sequences (Clip 1) and action is animated on 1's (Clip 2), so the action feels more impactful and commands audience attention. "Enkai" uses this for the fantastical narrative to communicate the world is very different from the world the audience is familiar with.
Nimona (2023) (DNEG & Netflix)
Nimona is a film by Netflix with animation services done by DNEG. Nimona's animation style appeals to me because of the way the character rigs have been pushed for clear an expressive movements for comedic effect. Such as the expressions or the very exaggerated poses which clearly give the story in one frame. The video on the right shows how the film blends subtle movement with exaggeration and knowing when to highlight each for the story.
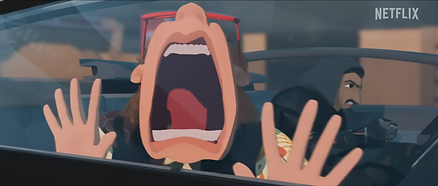

Exploring Cat/Human Media
Since I don't own a cat, I wanted to understand the the cat/human relationship: its appeal, the uniqueness and any quirks it may have. I found two media pieces that interested me and piqued an exploration: Garfield and Simon's Cat.

Garfield
Garfield is potentially one of the best known cat-like characters and the relationship between him and his owner, Jon, varies depending on the director and interpretation. Overall, Garfield is low-energy and cynical of his owner for being a human, but is highly motivated by the reward of food. The comics have Jon having very exaggerated gestures while Garfield's low energy characterisation is subtle in response to Jon's very expressive poses in the bottom row panels. While this isn't animated, it is an example of golden poses to show the contrast between the
characters which I am appealed by. However I feel as though the character of Garfield doesn't suit the story I want to tell since Garfield is anthropomorphised: standing on two legs like a human, he has his own thoughts expressed by dialogue and ideas that are intellectualised rather than instinctive towards his nature as a cat, etc. I think Jon here is a good inspiration, but Garfield doesn't quite fit.
Simon's Cat
Simon's Cat is a variety of 2D animations which focus on the relationship between pet and owner. To me, the main appeal of the story is how natural instinct of the cat conflicts with the logical reasoning of Simon. The cat is semi-anthropomorphic, being able to replicate human motion for when a shot calls for it, like using its paws to wield a bat to wake up its owner. While I think this a very appealing use of 2D exploration, it would end up being
more difficult to replicate that feeling in 3D with the Little Kitty rig. In addition, I really like the type of subtle, yet expressive movements the cat makes as opposed to the large exaggerated gestures; and similar to Garfield and Jon, I am appealed by the contrast of the large gestures to subtle ones. I feel as though Simon's Cat is closer to the vision I have of Kitty than the character of Garfield, but also too exaggerated in some aspects of the narrative.
UnReal Engine Workshop (Part 2)
The second workshop focused on assets and texturing them using Materials, incorporating Substance Painter, and setting up common materials.
Materials Basics
-
Learned about altering and creating material in UnReal Engine
-
Exploring the material properties (similar to Hypershader in Maya) with roughness, colour, emissive colour, etc.
-
Using material properties to apply a texture onto a material
PBR (Substance Painter) Textures
-
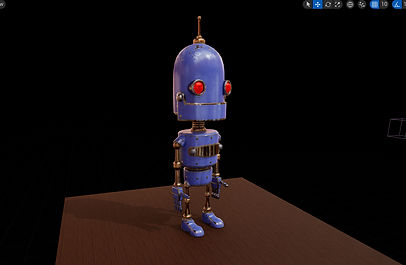
Exporting a Robot character from Maya to UnReal (with textures from Substance Painter) via FBX file
-
Applying various texture files (normals, base colour, etc) from Substance Painter to UnReal on Robot character using Material propeties
-
Making those properties look and feel like their properties (like metalness should feel metallic)
-
-
Preparing an UnReal project with no StarterContent
-
Lighting in UnReal with an HDR Reference
Pre-Workshop

Post-Workshop
Common Materials Setups
-
Learning how to make a variety of material which are common in UnReal Engine
-
Frenel Effect (I had no idea what this was)
-
Creating a aura sort of effect around a material so another colour 'grows' on the outside edge, similar to glass, light diffracting through glass, or an illumination effect
-
Can be used as a base colour or plugged into Emissive to really give a global illumination
-
-
Sub-surface scattering
-
By putting a colour (like red) in Subsurface colour while a skin tone colour (like peach) gives the effect of body since people don't just have skin but instead also have blood underneath which affects their colour.
-
-
Two-Sided Textured Plane
-
Texturing the normals (positive and negative) of a plane using Two-Sided Texturing Function and Lerp
-
-
Translucent Objects
-
Experimenting with opacity and altering shading models
-
Refractive models to bend light so objects seem distorted
-
FRENEL


SUB-SURFACE SCATTERING


TWO-SIDED PLANE

REFRACTIVE OBJECTS


UnReal Engine Workshop (Part 3)
The third and final workshop was about stylisation, importing assets between Maya and UnReal Engine, and camera movements in UnReal Engine.
Cell (Toon) Material
-
Followed a workshop where we experimented with Cell Material, similar to the toon texture because cel-shading is what is used in 2D animation.
-
The material properties is more of an overlay so it doesn't change the characters' existing textures, but rather the view of it throught the Post Process Volume.
-
Stage 1: Creating the Cell Material
-
Stage 2: Using a Flat Background and Bringing the Background back into the Viewport
-
Stage 3: Making a toon-shader character with a non-toon environment


Animated Assets and Alembic
-
Learning how to prepare an animated asset to be exported to Maya (smoothing, exporting using Alembic Cache).
-
Importing Alembic Cache into UnReal Engine via Geometry Cache (red) and Skeletal Mesh (blue). Had to scale up both in the UnReal Engine viewport since Maya and UnReal's scene scales are not the same
-
Using Sequencer to attach animation to geometry.
-
Noting Geometry Cache is more efficient, and Skeletal Mesh is a backup method.
-
Geometry Cache starting pose (red) prior to animation is the same as the first frame. Skeletal Mesh starting pose (blue) is different because of how its imported.
-
-
Matching frame rate in UnReal Engine's sequencer to the framerate in Maya.

Digital Sets & Films
-
Preparing a textured environment in Maya and using Game Exporter to export as an .fbx file to UnReal Engine
-
Creating an asset folder in UnReal in the Outliner
-
Adjusting lighting in UnReal for a more cinematic environment
-
Adjusting material properties for objects in UnReal Engine (metalness, roughness, translucency, etc)
-
Using a Shot Track and multiple cameras in Sequencer to create a "short film"
-
Makes a new sequence which takes the previous shot cameras in the sequence while being able to edit the original sequence.
-

Quixel Bridge in Unreal & Displacement
-
Quixel Bridge is a digital shop within UnReal that has several assets for UnReal.
-
Finding assets, textures and Modelling Mode.
-
-
Matching the ground plane to the assets in the scene.

Scene Scale Matching & Exporting Cameras
-
Understanding how to export environments, animations and cameras in Maya into UnReal Engine
-
Understanding how to scale a scene for UnReal Engine since the scene scale between Maya and UnReal are not the same (see "Animated Assets and Alembic" test above.)
-
Changing Grid in Maya (Display > Grid) to match grid in UnReal Engine
-
Setting ShotCam for the right aspect ratio for UnReal engine.
-
Animating a Camera to export to UnReal via .fbx file
-
Readjusting Camera Focal Length and Focus in UnReal cameras
-
Reassigning Materials to imported scene in UnReal


Universal Scene Description (USD) Discussion
-
Exploring USD (created by Pixar) which comfortably transfers scenes in between multiple animation softwares.
-
While this is an incredible tool, it is still in its infancy stages of being developed so it is not perfected or as reliable as expected at the current moment.
-
This is a really incredible piece of technology which interests me since I have experimented with Blender, Maya and UnReal Engine, so it would really work well with my workflow.
Iris Transition in After Effects
In my conception, I wanted to re-emulate Chuck Jones cartoons like the Looney Toons or Merrie Melodies while using shapes to make the audience focus on the cat's reaction to the events as the short ended. I was debating between using Maya or After Effects, so I did some research into it and found a YouTube video for After Effects and it seemed easier than using Maya around 3D cameras.
Recording Reference Tests
Since I had ideas of the movement in my head, I began doing reference footage tests to express movements and ideas in my head and develop it further. While I do like my experimentation, I didn't have anyone to frame the reference properly according to the vision in my head, so had to use a static camera from one angle each time. I tried to switch the angle to get the staging view, but I needed the full body for reference.
CREATURE WORKSHOP, Part 1
Ollie Trotman, a 3D Senior Animator at Sumo Digital, was doing a two-part creature workshop for Weeks 7 and 8 for the Year 2 animation students which I joined since my FMP was focused on quadruped animation. He focused on a big cat (a lion) and gave tips and tricks for Maya and revealed how he thinks while animating quadrupeds. Even if I may not incorporate all of this information, it is really amazing to see an expert at work. On the left, I have compiled my notes from Part 1 in a PDF format of things I found could help me.
CREATURE WORKSHOP, Part 2
Here, I've added my notes from Ollie Trotman's creature workshop in Part 2. For my notes on Part 1, see "Research - Week 7".
ANIMATING CONSTRAINTS IN MAYA
For Shot 3 & 4 I wanted to figure out how to use constraints betweeen two rigs in Maya. (Specifically for Superhero hands and Book rigs) So I found this tutorial which showed me how to have both contraints of the Human holding the rig and be able to throw it.
Eye Darts
Since I have a lot of close ups of my characters and their eyes, I wanted to explore eye darts, which is a way to make eyes of the characters have subtle movements so they feel alive even while they're not making a lot of movement. I found two tutorials. One from AnimSchool and another from Agora Cfmmunity on how to do eyedarts. Anim School focused more on the theory and detailing of eye darts, while Agora Community showed an eyedart example and actually gave feedback on it.
An important part emphasised was the skin cluster overlapping the eye and following the eye movements a la Secondary Action. AnimSchool gave a trick on using slow in & slow out keyframes and making the movement be triangular or quadrulateral. This was interesting because usually I follow the arcs animation principle, so it was unique.
Book Pile
For Shot 18 onwards I was trying to find a way to efficiently put the book pile instead of putting each one bit by bit for the crash. I remembered a Dice test I did at Escape Studios back in 2020 with dice falling and creating gravity FX. I did not remember how to do it though, so I researched it. I found video on the right that explained passive/active rigid bodies and gravity FX simulation.
Shot List Research
After the Presentation in Week 9, I knew I had to review my shot list for my work (see "Project Management: Shot Management" for previews) I found a video going over elements of a shot list, and decided to repurpose it for my personal project and for visual efficiency.
Book Pile - Buddy Bullet Script
Since the gravity simulation test last week didn't work, I did more research into the book pile.
I found this Tumblr artist (@polgonspixelandpaint) who made a post on a script they used called "Buddy Bullet" to use repeated objects and have them fall. (Their video from Vimeo demonstrating is on the left). I was excited to use it, then I had issues with accessing the page because of a Backend failure from the HighEnd 3D website. I emailed their support to try and access it, and asked the user on Tumblr for an alternative means of access. Did not recieve a response back as of Week 11.

Book Pile - Mash and Bullet FX
While I was waiting for a response on Buddy Bullet, I did some additional research and found this video. This focused on using the MASH FX tool, which is already available in Maya to duplicate, spread and rotate a variety of assets and duplicating them for a final asset. I thought it was really fasincating how visual effects tools can do work that is so tedious if an artist were to do it by hand.
Gathering ALL Reference
Since I was approaching the submission date, I knew I had to gather all my reference footage for my animation. I collected and performed my animation reference so I could have a clear understanding of movement.